Friday, March 11, 2011
Photography Tips
I just found this article on how to take pictures of your scrapbooking pages. I've actually been scrapbooking quite a bit in the last month, but haven't been posting since I've been pretty discouraged about my photo quality, hopefully this will help. The good new is that I have been catching up on my journaling. I'm probably 5 years behind on it and it was becoming a big stumbling block. What finally got me over it was that I did a few pages of recent events that I could clearly remember what happened and what I wanted to say. I'm now really inspired to get caught up because it felt so good to put those page protectors on!
Thursday, February 10, 2011
Made by Momo Tuesday Challenge

This valentine is for my DH. I'm really happy with how this turned out. This heart is from indie art cart and was cut at 2.8". The card is from Christmas Cards (Snowman, "Let it Snow" Card) height 4.25". The stamp is Stampin' Up. The bling is Me & My Big Ideas.
Thanks for looking!
My Pink Stamper Challenge

I made these two cards for my kids for Valentine's Day. I think they are going to love them. All the cuts are from the Birthday Bash cartridge.
Cuts for turtle card:
Card and Star are from pg. 24; height 4.25"
Turtle and all layers from pg. 47; height 1.25"
Cuts for ladybug card:
Card from pg. 34; height 4.25" (To make this card A2 size this should have been 5.5", it ended up too small)
ladybug and all layers from pg. 64; height 1.9"
Thanks for looking!
Tuesday, February 1, 2011
My Pink Stamper's Yummy Challenge

This is my entry for My Pink Stamper's Yummy Challenge. I don't have an imagine so I just used my regular cricut. This page is for my daughter's birthday. I tried to make it very girly since she loves girly colors and is into princesses right now. The fun fact for this page is that cutting the cupcake used up my first mat! I'm a little disappointed that I've already used it up. I have wiped it clean as suggested which gave me probably 5-10 more cuts. I've seen the videos showing how to re stick the mats using a zig pen, but I don't want to do that since my cricut is still under warranty. I do think it will be really handy to have a couple more mats, but I'm hoping they will last longer! Second fun fact about this page...I think this is the first time I've made a page with out the photos! Okay, recipe for this page is:
- Cuts:
Cupcake from Birthday Bash cut at 3.5"
Phrase: I made on my Gypsy using Birthday Bash font -"Sarah" at 1.22"; 4 at 1.83" and 1.80"
"turns" cut using Printing 101 at 1.27" - Paper
Pink from Creative Memories Thanks to you Happy Moment
Black with Purple is Core'dinations Black Magic
Green is Core'dinations
Black & Black lined paper is Creative Memories
Hot Pink is from my scraps - Stickers
Retired Creative Memories - Diamond Stickles
Thursday, January 27, 2011
Peachy Keen Stamps Challenge #44

This is a 4x6 photo album for my Grandma. She lives in England so I try to send her pictures once a month. So for Christmas I asked for and received the Your Story Photo so that I could bind the photos together that I send her. I like it for that purpose but I'm not impressed with how the pages fold. I scored the photos as recommended and they still arch open. I do like how fast it is so I guess everything has pros and cons. The recipe for this cover is:
Paper
Paper
- Dark Green - DCWV Neutral Cardstock stack (I'm having a hard time cutting with this paper due to its white core. I've been doing a lot of intricate cuts though, so that may be the problem)
- Green Pattern Paper from K & Company Eloise stack
- Paper for the snowflake is from my scraps
Cartridges
- Font - Printing 101 (I got this at Michaels, its on clearance, and it is my favorite font. You can also get it with your cricut points.) cut at 0.75"
- Snowflake - Creative Memories Cheerful Seasons cut at 2" (I would not recommend cutting the final layer any smaller...it is very intricate and barely worked at 2")
Tuesday, January 25, 2011
My Son's Birthday Card
So I'm finally getting over the flu I got over a week ago. It feels great to have some energy and get at least some of my to do list done! Here's a card I made for my son's upcoming birthday. He will be two.
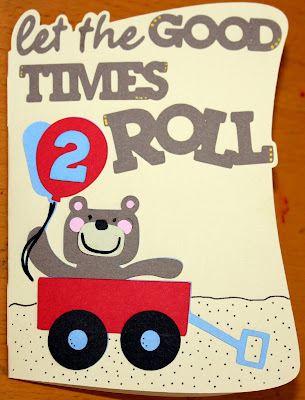
I meant to make this a little fancier, i.e. pop dots and some inking, but I got so wrapped up in putting it all together that I forgot. I think this is the most layers I've done yet. This is from the Birthday Bash Cartridge, which I just got. It has a some really fun critters on it and I really like the font.
Recipe:
Card and matching phrase cut at 5.5" (this makes it an A2 card); paper from Creative Memories Scenic pack
Bear and its layers cut at 3.5"; paper also Creative Memories
2 cut at 0.7"
Hope you like the card and I would love feedback!
Sunday, January 23, 2011
Twin Babies Card

This card is for a friend who is expecting twin boys. I wanted to give them their own personalities like twins always have. The recipe for this card is:
Babies from Everday Paper dolls cut at 3", their paper is Creative Memories
Card and background is from Birthday Bash and is cut at 4.25", the paper for the card is Bazzill and the background is K & Company' Small Wonders Boy Paper Pad.
Sorry I have been missing this month. January is very busy for us. We have the usual Christmas aftermath, but also our wedding anniversary (It was our 10th this year), and both my kids have their birthdays (4 & 2). So we are having a lot of fun and making a lot of memories!
Wednesday, January 5, 2011
My Pink Stamper Design Team Submission
Here is my submission for the My Pink Stamper Design Team.

The recipe for this card is:
- Card from Christmas Cards cut at 4.25" (Brown paper from DCWV Neutral cardstock stack; pink paper from my scraps)
- Butterfly from Gypsy Wanderings cut at 3" (Green paper from DCWV Neutral cardstock stack; Green pattern paper from K & Company Eloise stack)
- Flower from Gypsy Wanderings cut at 1" (Paper is from Creative Memories)
- Stamp is from Stampin' Up Great Greatings and was stamped in Color Box Evergreen ink...I got it for Christmas I didn't realize how long it would take to dry :o(
- Ribbon came in a grab bag
- Finally, Diamond Stickles for some added bling
I like how this card came out, unfortunately I didn't have much time to work since I just got back from my holidays yesterday. I'm definitely learning what works with the Cricut and what doesn't. Hopefully I'll be doing more scrapbooking soon, since I have a lot I would like to catch up on.
Subscribe to:
Posts (Atom)